Thursday, February 16, 2012

A New PB Choc Chip Muffin Recipe, My Favorite Salad, and a Quickie Manicure!

My previous PB Choc Chip recipe is wonderful, if you eat them on the same day you bake them. They tend to dry out after the first two days, but the domed top is priceless & they scream "eat me"!
So, the following recipe, though not as beautiful coming out of the oven, is more moist.


 Sorry to leave you hanging without notes on baking, but the recipe (found below, at the end of the post) is pretty self-explanatory. :o) And I am recovering from a migraine.
See how these come out with some dark peaks? You can avoid that by placing a baking sheet on a rack above the muffins in the last 5 minutes of baking. Clearly, I failed to take my own advice. Twice.

Now for the salad!
This is my favorite lately, and I've been craving it consistently for more than a month! My husband has been loving it right along with me (as well as the swiss mushroom burgers, homemade greek salad, pickles on cheeseburgers, and....). They call it Sympathy Food Cravings for men, but he doesn't look sympathetic. He looks downright wild like a hungry coyote! LOL.

Anyways, this salad is directly from a magazine, and I'm not ashamed to say I didn't create it myself. Although, I DO add a few items to compliment the flavors. Try adding thinly sliced pears or apples. They seem to complete the flavors in the salad! DELISH!!!
 The dressing isn't hard to make, and you can subsitute nearly any lemon product for the lemon flavored olive oil, although (fresh) lemon peel does make it *pop* so much more than just adding lemon juice to the olive oil.
I've had this salad with candied or glazed pecans as well. Your personal taste is really what determines which is appropriate. Do you have a sweet tooth? Then use the candied or glazed pecans. Our family prefers just plain toasted pecans (my four year old will eat them only raw. She says the baking makes them bitter lol).

I had originally planned a ZOYA manicure touchup, but the colors never worked together, so I started over with new colors. And they're not Zoya. Tee hee.
There was a particular [maternity] outfit that I had in mind to wear on the weekend, and reverting to my late teen years, I wanted to coordinate my polish with it. That was the intent of the original ZOYA plan, but my brown (Faye) and bronze (Ivy) were too similar to show contrast, and my polish caboodle doesn't boast the wonderful array that many of [your] blogs do! *wink* To top off the bad manicure idea, the Essie Set In Stones (diamond-dipped look) looked terrible on top of them (this was to be the touch-up idea). I suppose I need a GOLD glitter top coat after all, for my browns. *frowns at the idea of spending more money on polish*
So, as shown above, I painted PURE ICE "Best Friend" on all my nails first. (I own a LOT of Pure Ice. It seems to be my favorite drug store brand. Is it silly that one of my favorite features- besides price point- is the size and shape of the bottle, because it's easy to handle between knuckles as I paint? For some reason, I hear my sister saying that in one of her posts. Ha ha!)

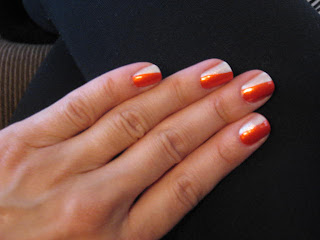
Next, I swept across half my nail in a diagonal fashion,  PURE ICE "Hot Tamale" (I like that name, but it reeks of  Mary Murphy's outbursts on SYTYCD... Sheesh, I miss that show! Is it time for the season premiere yet???)
My third coat was, again "Best Friend" over the whole of the nail, in order to tone down the orange. My oufit was a rusty orange, not a halloween orange. :o)
The end result was a little more bland than I desired. You pretty nearly couldn't see any contrast unless you were staring closely at it. But the touch up stage glammed it up a bit. Enough for the rest of the week, anyway. *wink*

...and the touch-up idea was to dip my whole nail in ESSIE's LuxEffects "Set In Stones". I'm addicted to that little bottle of glamour. I don't even care that it takes 10 minutes to remove.

WHATCHA THINK?
Later this week, a Farfalle Asparagus salad, some fun(?), new manicure with the new colors Michelle sent me in the mail, and maybe a new muffin recipe (coffeecake), IF it turns out well. In a moment, I'm going to test a recipe for coffeecake in the form of muffins. :o) So excited to offer a new idea for sale locally if it tastes awesome!

PEANUT BUTTER & CHOCOLATE CHIP MUFFINS

Ingredients

1 1/2 C flour
1 C chocolate chips
1/3 C sugar
1 T baking powder
1/4 tsp salt
3/4 C milk
1/2 C peanut butter
1/3 C vegetable oil
1 egg

Preheat oven to 400F. In large bowl, combine flour, chocolate, sugar, baking powder, and salt. In small bowl, combine oil, peanut butter, egg and milk. Stir into flour mixture until just moistened. Spoon into lined or greased cups, filling 3/4 full. Bake 20 minutes (or longer for jumbo) or until toothpick comes out clean when inserted into center. Cool in tins for five minutes. Remove to rack. Serve warm or cool completely. *check on your muffins about 15 minutes into the baking time. If they are browning too quickly, place a cookie sheet on a rack above the muffins.

Sunday, February 12, 2012

Couple of Sassy Manis, Couple of Sassy Girl Photos

 Hiding in a photo folder somewhere in my laptop, I found the manicure from last week (& the photos aren't as blurry as I thought). I plan to recreate it sometime this month, because I received multitudes of compliments from people everywhere. Even my daughter asked me to repeat it when she saw the photos just now.
 On one slant, I used Sephora by OPI's "Shiny Dancer" and on the opposite slant is PURE ICE's "A List". As a top coat, Essie's luxeffects "Set In Stones" provided a glittery, glossy, glitzy, glamorous finish that really caught the eyes of all ages and lifestyles.
 One night, I was laying near a window, the moon was full enough to cast light into my room, and the reflection on my nails kept me up longer than I should have allowed. From the "Shiny Dancer" angle, I saw nothing but sparkles. From the "A List" angle, I saw flashes of light because he color is so bright and metallic in nature. I sat, turning my hands from one side to the other, admiring the shimmer and the 'glow-in-the-dark' effect.
My only complaint (& the reason I didn't use Set In Stones for today's manicure) is how long it takes to remove the glitter polish, but it was worth the effort!
 My post wouldn't be complete without a current photo of my firstborn to share with relatives abroad (what am I talking about? All of our relatives are abroad...across the continent anyway). Victoria picked this fidora a few months ago, and she has a knack for wearing it. When we go out in public with that hat, I prepare for compliments, comments, stares, giggles, and exclamations. She is JUST too cute in it. (She actually posed this face on purpose.)
 When she sees me paint my nails, the reaction is the same: "Paint mine, too. Paint them rainbow." Each time, I attempt to mix it up a bit, because I'm bored with rainbow. Today, I successfully recruited purple, red, and pink, in time for her "Heart Parties" on Monday and Tuesday.
 I grew tired of my red manicure dipped in diamonds from last Thursday, because, well, I felt like blogging and didn't have enough material to write. I chose re-painting nails over baking new muffins. LOL.
 I'm really not a fan of reversed french tip manicures, but I wanted red for this week. Sorry to admit that I also didn't spend much time on making it look good, because I plan to remove it by Thursday. :o) I have some ZOYA plans for the weekend.
 One day, my mother and daughter talked on the phone. "Mema" asked her a series of questions, and I took photos of the 'answers'.
 Can you kiss your elbow?
 Can you touch your nose with your tongue?
Can you bite your heel?
Ha ha ha. Hope you had a good laugh, if nothing else this time.

Tuesday, February 7, 2012

Diamond Drenched Nails & Stylish Straightened Hair

This morning, I decided to straighten my hair (I had slept on wet hair, & I didn't want to have bed-head). My four-year-old daughter woke up, caught me in action, and upon learning what I was doing, requested the same style for her own.  


Here is the result of our first hot iron experience together.

My last manicure* was such a hit in the various places I've been this weekend that I felt a temporary inspiration to try it again. 
* I'll try it again in the future and take photos to post if anyone is interested!

Tori wanted to share her BAB cat, Stripes, with my family. Thought I'd share her here. :o)


(Tori and her tap shoes. She dances to all her shows' intro songs.)
And there she is... STRIPES the dancing cat. In case you can't tell, the shirt is layered in sequins. She's a fancy tapping cat.


MY BEAUTIFUL GIRL...

The recent layering in her hair added a sweeping effect around her face. I love that.

This manicure really is quite stunning, but my 5 year old 6.0 pixel camera lacks what it takes to capture close-ups in focus, amazing color, depth and shimmer.
NYC's "Broadway Burgundy Frost" is a deep red with a slight shimmer.


I had this vision of my tips dipped in diamonds, so I coated them in Essie's LuxEffects "Set In Stones" top coat. (http://www.essie.com/luxeffects/?cm_mmc=LabeliumSearch-_-Google-_-SiteLinks-_-essie%20set%20in%20stones&gclid=CJ7NzbHrjK4CFYmK4AodjRV6eQ)


I love this manicure and will likely use it year-round. My only regret is not being able to capture the luxury of it on camera. You'll have to just believe me or buy them and try it yourself!

Sunday, January 15, 2012

Moist Orange Muffins filled with Almonds & coated w/a delicious orange icing!

 We haven't baked this recipe since late summer, so naturally, when I pulled it out of the 'archives', I decided to perfect the icing and the consistency. Much to my delight, it is more moist and flavorful. It's my new favorite.


(I prefer to use pure extract, and Watkins from Walmart affords me that opportunity without losing profitability).
After mixing your wet ingredients (because I like them to reach room temperature before making the batter), sift/whisk dry ingredients & grate as much orange peel into your dry mixture as you desire.The recipe just gives a guideline. 


JUST combine wet into dry ingredients and fold in 1/2 cup of almonds. (Reserve remainder for topping). Bake and cool the muffins completely before adding icing and almonds.


For the icing, add melted butter to confectioner's sugar. Then, add orange juice & vanilla & whisk. 
Add a tablespoon of milk at a time, using only what you need to reach desired consistency. Grate more orange peel into the icing (as much or as little as you desire) and stir.

Once muffins are cooled, top with icing and sliced almonds!

ORANGE ALMOND MUFFINS
INGREDIENTS:
2 C flour
2 T baking powder
1/2 tsp salt
3.4 C sugar
1 lg egg
1 C milk
1/3 C veg oil
1 T orange zest
1 tsp orange extract
2/3 C sliced almonds

Icing:
1+ T milk
1 C confectioner's sugar
1/2 stick (1/4 C) butter, melted
1/8 tsp vanilla (to taste)
1/2+ T orange juice
1 T orange zest

INSTRUCTIONS
Preheat oven to 375F. Line jumbo muffin tins with paper liners. In medium bowl, whisk together egg, milk, oil, orange extract. In large bowl, whisk together flour, baking powder, salt, and sugar.  Stir orange zest into flour mixture to coat. JUST combine wet mixture into dry ingredients and fold in 1/2 cup almonds. Fill muffin cups 2/3 full. Bake 20-25 minutes. Cool completely! Icing: add melted butter to confectioner's sugar. Stir. Add vanilla and orange juice to mixture and whisk well. Add milk, one tablespoon at a time in order to reach desired consistency. Stir in orange zest.
Top cooled muffins with icing and remaining almond slices.

Thursday, December 22, 2011

Another coffeecake...

BUTTERY CREAM CHEESE COFFEECAKE
This recipe is from Food. com, but I'm sharing it because it is SOOO good! I find coffeecakes to be very involved and time consuming, but our family loves to eat it above other baked goods, so I don't mind making it for us. Enjoy!

Not much narrative to add tonight; X Factor is on! :O) I creamed the butter and sugar with a spoon. Obviously, go ahead with a mixer. I'm so muffin-minded that I do everything by hand!


Coffeecake batter is always so thick! I did follow directions and put more than half (2/3?) of the batter at the bottom. Greased the 9x13 with just butter.

Brief peek at the filling ingredients... 2 packs cream cheese, egg yolk, sugar and vanilla. Beat with mixer (recipe doesn't specify).

Spread whole bowl of filling over the batter in the pan. Taste some! It'll get your taste buds going for the end result! Spread remaining batter over filling (will look like not enough).

Mix the topping- flour, butter, sugar. My butter wasn't soft enough, so it didn't produce the right end result. but after baking, it looks fine.

Sprinkle (pour) topping over batter.  
I sprinkled nutmeg and cardamom over the top STRICTLY for picture purposes. :) All of my photos are white and yellow. I'm sure the flavors will accentuate the vanilla cream cheese flavor! 


RECIPE

Ingredients
    CAKE
1 cup butter (no substitutes)
1 cup sugar
2 eggs
1/4 cup sour cream
2 cups flour
2 tsp baking powder
1/2 tsp salt

   FILLING
2 (8 oz) pkgs cream cheese (softened)
1 egg yolk
1 cup sugar
1 tsp vanilla

  TOPPING
1/4 cup sugar
1/2 cup flour
14 cup (half stick) butter (semi softened)

Directions
Preheat oven 350F(oven rack set to second lowest position)
Grease 13.9 inch pan
CAKE: Cream butter with sugar (3-4 minutes). Add eggs and sour cream; beat well (another 3 minutes). In seperate bowl, sift together flour, baking powder and salt. Add flour mixture to creamed mixture; beat well until combined (batter will be thick). Spread more than half the batter in prepared pan.
FILLING: In another bowl, cream together all filling ingredients, then carefully spread over cake batter.
Spoon remaining cake batter over top of cheese mixture (it won't cover the cake batter completely).
TOPPING: Mix all ingredients and sprinkle over cake.
Bake for 50-55 minutes or until middle feels set (not jiggly).


Sunday, December 18, 2011

A bit of a tangent from the muffins... COFFEECAKE ANYONE?

CRANBERRY STREUSEL COFFEECAKE

This is my favorite breakfast 'bread' to make for my family. Because we prefer the sweet joined by tart, this recipe creates the perfect combination for our peculiar tastebuds! I'll admit, it's a bit involved, but if you're in the mood to really bake (not just throw some flour into a bowl and mix with wet ingredients), you will enjoy making this delicious coffeecake. So, grab your measuring cups and bowls, and let's get baking!

First, place in a small saucepan 1-1/2 cups fresh or frozen cranberries, 1/4 cup sugar, and 2 tablespoons orange juice. Cook over medium heat. Stir constantly until berries start to pop, then remove from heat and set aside. 

 See here, my four-year-old helping me pound the walnuts into chunks for the streusel (which is next on our task list). You don't have to pound your walnuts into the right size. I usually use a chopper or knife, but she really wanted to help, and this was the safe alternative.
Combine in a small bowl 1/2 cup of walnut pieces, 1/2 cup light brown sugar, 1/4 cup flour, 1/2 teaspoon cinnamon, and 2 tablespoons softened butter. Mix together with a fork until it's crumbly and set aside.

Stir together 1-1/2 cups flour, 1-1/2 teaspoons baking powder, 1/2 teaspoon salt in a small bowl. Cream 6 tablespoons butter (softened), 3/4 cup sugar, and 2 teaspoons grated orange rind. Then, add two eggs (ONE at a time), beating well after each. Stir in flour mixture alternately with 3/4 cup milk, beginning and ending with flour.

Spread half of the batter over the bottom of a greased and floured square pan. Sprinkle half the streusel,
then spoon half the cranberry filling. So beautiful!!!!
Cover with remaining batter; top batter with remaining filling

 & sprinkle with remaining streusel.
 Bake 50-60 minutes in preheated oven (350F) or until knife comes out clean. Clean on wire rack. Serve warm or room temperature!
 This is my 2nd time to make the cake. It comes out lighter if you use LIGHT brown sugar. I only have dark brown sugar, which I use for my muffins, but it still tastes great!